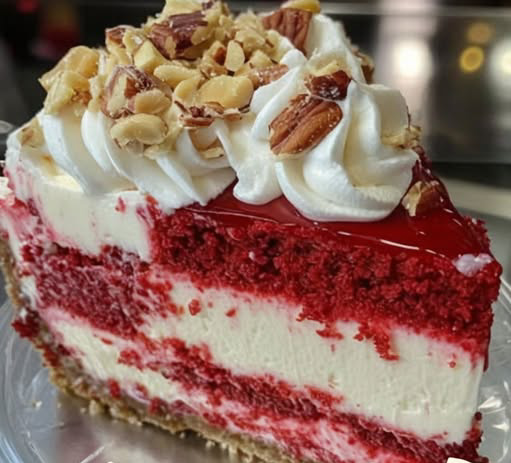
Red Velvet Strawberry Cheesecake with Nuts — a show-stopping layered dessert combining moist red velvet cake, creamy baked cheesecake, strawberry glaze and crunchy pecans. Step-by-step recipe, tips, storage, and easy variations.
Why you’ll fall in love
This dessert balances velvet-soft cake, silken cheesecake and bright strawberry topping with a nutty crunch — every forkful is creamy, tangy and comfortingly indulgent. It’s dramatic enough for celebrations but soothing enough for slow Sunday baking.
Tools you’ll need
- 9–10 inch springform pan (recommended: 9-inch for taller layers)
- Mixing bowls (large and medium)
- Electric mixer (hand or stand)
- Saucepan (small) for strawberry topping
- 9-inch round cake pan (for red velvet layer)
- Baking sheet for water bath setup or a deeper roasting pan
- Measuring cups & spoons, rubber spatula, whisk
- Cooling rack, plastic wrap, offset spatula (optional)
Ingredients (correct quantities)
For the crust
- 2 cups graham cracker crumbs (about 200–240 g)
- 1/4 cup granulated sugar (50 g)
- 1/2 cup unsalted butter, melted (113 g)
For the red velvet layer
- 1 box red velvet cake mix (prepared according to package)
- 2 large eggs
- 1/3 cup vegetable oil (80 ml)
- 1/4 cup buttermilk (60 ml) — optional for extra moisture
For the cheesecake layer
- 3 (8 oz) packages cream cheese, softened (total 24 oz / 680 g)
- 1 cup granulated sugar (200 g)
- 3 large eggs
- 1 tsp vanilla extract
- 1/2 cup sour cream (120 g)
For the strawberry topping
- 1 cup fresh strawberries, chopped (about 150 g)
- 1/4 cup granulated sugar (50 g)
- 1 tbsp lemon juice (15 ml)
For the nuts & garnish
- 1 cup chopped pecans or walnuts (about 100–120 g)
- Whipped cream for topping (as desired)
Step-by-step instructions
1. Prep & preheat
Preheat oven to 325°F (163°C) for the cheesecake crust and layer. Grease the springform pan lightly or line with parchment on the bottom.
2. Make the crust
- Mix graham cracker crumbs, 1/4 cup sugar and melted butter until evenly moistened.
- Press mixture firmly into the bottom of a 9-inch springform pan (use the bottom of a measuring cup to compress).
- Bake 8–10 minutes until set. Remove and cool on a rack while you prepare the cheesecake batter.
3. Prepare the red velvet cake layer
- Make the red velvet cake mix according to the package, adding the 2 eggs, 1/3 cup oil and the optional 1/4 cup buttermilk for more tenderness.
- Bake in a 9-inch round pan (follow package time/temperature). Cool completely on a rack. You can bake this ahead of time — it stores wrapped in foil for 1–2 days in the fridge.
4. Make the cheesecake layer
- Reduce oven temperature if your cake directions require different temps for the red velvet — the cheesecake bakes at 325°F (163°C).
- In a large bowl, beat the softened cream cheese until smooth and lump-free. Scrape the bowl.
- Add 1 cup sugar and beat until creamy.
- Add eggs one at a time, mixing gently after each addition (overbeating introduces air and can cause cracks).
- Mix in vanilla and sour cream until silky.
- Pour the cheesecake batter over the cooled crust in the springform pan. Smooth the top.
5. Bake the cheesecake (water bath recommended)
- Place the springform pan inside a larger roasting pan. Pour enough hot water into the roasting pan to come about halfway up the sides of the springform (this is the water bath).
- Bake 55–65 minutes at 325°F (163°C) or until the edges are set and the center still jiggles slightly when gently shaken.
- Turn off the oven and crack the door; let the cheesecake cool in the oven for 1 hour (this gentle cooldown reduces cracking).
- Remove the cheesecake from the water bath, cool to room temperature, then refrigerate at least 4 hours or overnight for best texture.
6. Make the strawberry topping
- In a small saucepan, combine chopped strawberries, 1/4 cup sugar and lemon juice. Cook over medium heat until the strawberries break down and the mixture thickens slightly (5–8 minutes).
- Cool completely. You can puree part of the mixture for a smoother glaze, or leave it chunky.
7. Assemble the layers
- Carefully release the chilled cheesecake from the springform. Place the cooled red velvet round cake on top of the cheesecake layer (center it).
- Spread the cooled strawberry topping evenly over the red velvet layer.
- Sprinkle chopped pecans or walnuts around the edges or across the top. Add dollops or a border of whipped cream if desired.
- Chill assembled cake 1–2 hours to let layers set together before slicing.
8. Serve
Slice with a hot, clean knife (dip in hot water and wipe between cuts for neat slices). Serve chilled.
Tips for guaranteed success
- Avoid overmixing cheesecake batter. Beat just until smooth to minimize air — less air = fewer cracks.
- Use room-temperature cream cheese and eggs. This yields a silkier batter with no lumps.
- Water bath is worth it. It stabilizes oven heat and keeps the top from cracking. Wrap the springform pan base in foil if your water bath might let water in.
- Don’t rush the chill. Baked cheesecake firms as it cools — overnight refrigeration gives the best texture.
- For cleaner slices, wipe the knife between each cut with a hot towel.
- If red velvet layer is too tall, gently trim the domed top so the assembled cake stacks evenly.
Variations & additions
- Chocolate lovers: Spread a thin chocolate ganache between the cheesecake and red velvet layers.
- Fruit swap: Use raspberries or mixed berries instead of strawberries.
- Nut-free: Omit the nuts and add toasted coconut flakes for crunch.
- Mini versions: Make in 6-inch pans or individual jars for portion control.
- Lighter option: Use reduced-fat cream cheese and less sugar, but expect slightly different mouthfeel.
Storage & reheating (keep flavor & quality)
- Refrigerator: Store covered for up to 4 days. Keep in a cake dome or tightly wrapped to prevent fridge odors.
- Freezing: Wrap tightly (plastic then foil). Freeze up to 2 months. Thaw in the fridge overnight. Note: nuts may soften slightly after freezing.
- Reheating: Cheesecake is best served chilled. If you prefer the strawberries slightly warm, microwave a small portion of topping for 10–15 seconds before spooning onto slices — do not microwave the whole cake.
Approximate nutrition (per serving) — estimate
This is a rough estimate for 12 servings (one slice = 1/12 of the assembled cake). Exact values depend on the cake mix brand, exact weights and portion size.
- Calories: about 550–700 kcal per slice
- Fat: ~ 30–45 g (saturated fat 12–20 g)
- Carbohydrates: ~ 50–70 g (sugars 30–45 g)
- Protein: ~ 6–10 g
Note: For precise nutrition, enter your exact ingredient brands and weights into a nutrition calculator (examples: USDA FoodData Central or a trusted nutrition app).
Prep & timing summary
- Active prep time: 30–45 minutes (making crust, batter, cake batter)
- Baking time: Red velvet (package time ~ 20–35 min), cheesecake 55–65 min
- Cooling & chilling (passive): 5–12 hours (1 hour in oven, 4+ hours in fridge, additional chill after assembly)
- Total time (including chill): ~7–12 hours depending on overnight chilling
Frequently Asked Questions
Q: Can I skip the red velvet layer and swirl the cake into the cheesecake?
A: Yes — you can swirl a small amount of red velvet batter on top of the cheesecake before baking for a marbled effect, but whole red velvet rounds give the dramatic layered look.
Q: My cheesecake cracked — how can I fix or avoid that?
A: Minor cracks can be hidden with strawberry topping and nuts. To avoid cracks: don’t overbeat; use a water bath; cool gradually in the oven with the door cracked; and chill overnight.
Q: Can I make this in advance?
A: Absolutely. Bake the cheesecake and the red velvet layer a day ahead. Assemble the next day for optimal flavor melding.
Q: What if I don’t have a springform pan?
A: You can use a deep cake pan and unmold carefully, or build the dessert in a tart pan, but a springform is easiest for layered removal.
Q: Can I use frozen strawberries?
A: Yes — thaw and drain excess liquid before cooking the topping; you may need to cook a bit longer to thicken.
Final notes
This recipe is part showpiece, part comfort — it takes patience, but the payoff is a dessert that looks like it came from a bakery and tastes like homemade love. Play with the strawberry finish and nuts to match your mood: toasted pecans for warmth, walnuts for rustic crunch, or keep it elegant with whipped cream rosettes. Take your time on the chill — that’s where the magic happens.